iOS 7 – Add Parallax Effect to Your Apps using UIMotionEffect API
One of my favorite iOS 7 features is the sense of parallax – where you can see how icons move around on the home screen or how alert views float above other views. It’s a really great way to give users the sense of depth and motion in your apps – even while fully embracing the iOS 7 theme (a simplified and flat user interface).
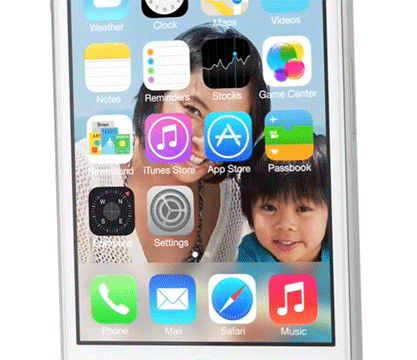
Take a look at the use of parallax on the home screen. Notice how the background appears behind the app icons and the badge appears to float above it. Motion effects tie animations to the movement of the iOS device.
Apple has made this extremely easy to implement! This is made possible by using UIMotionEffect. This is the API that is used to create effects just like you see on the home screen. UIMotionEffect takes the iOS device motion as an input.
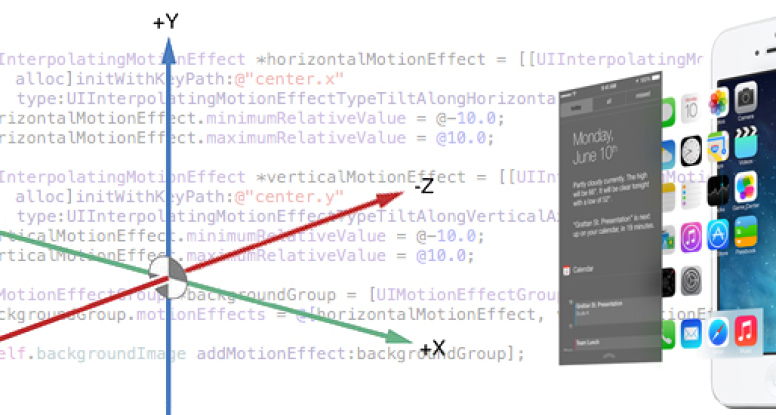
For me to understand how motion effects work, I really needed to understand what the inputs are to device motion. The below helped me out.
As I tilt my iPhone to the right, I get a positive 1 effect. As I tilt it to the left, a negative 1 effect. As I tilt it down, I get a positive 1. And tilting up, I get a negative 1 effect.
To further the simplicity of adopting the motion effects in your app, Apple provides the subclass UIInterpolatingMotionEffect.
It’s very easy to use interpolating motion effects to interpolate between the minimum and the maximum value that is defined. The animation is applied to a key path this is provided. From there, the interpolating motion effect is automatically updated, based on the iOS device motion as the user interacts with the screen. And all that is needed to make this work is to attach them to a UIView anywhere in your app. It really is that simple!
First, you need to create two instances of an UIInterpolatingMotionEffect. One for the x-axis and one for the y-axis.
Create one with a key path of center.x and set its type to UIInterpolatingMotionEffectTypeTiltAlongHorizontalAxis. Give it a minimum and maximum relative value of negative 10 and 10. This means that wherever center.x is normally for that view, it will not deviate more than 10 points in either direction on the x-axis.
You need to do the same thing for the y-axis. It is almost the same code. The only thing that is different is the key path, which is now center.y and the type is vertical access. And since you want these to be evaluated at exactly the same time, you should create a motion effect group.
I think motion effects are a really cool way that we can use to make all of our apps come alive! They can make the apps feel really interesting and engaging.
There are more advanced motion effects to check out. The UIMotionEffect Class Reference: https://developer.apple.com/library/ios/documentation/uikit/reference/UIMotionEffect_class/Reference/Reference.html